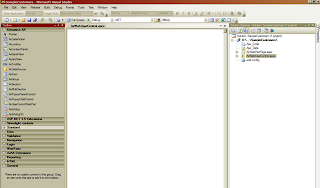
- The new Dynamics AX 2012 Editor
2. Create EP List pages in .net
THE BASICS
Let's start with covering the basic parts of developing on EP 2009. The purpose is to introduce the core concepts and along the way draw similarities with EP 4.0. That should help developers who are familiar with EP 4.0 get up to speed with the new framework.
There are three parts needed to create a simple page that binds to AX data.
- Sharepoint web part page
- ASP.NET User Control
- AX data set
The last two bullets are new concepts in EP. In EP 4.0 the developer created a web form in the AOT containing controls bound to form data sources and the web form would be added to the Sharepoint web part page using the Web Form web part. In EP 2009 the web form has been replaced by ASP.NET User Controls which contain ASP.NET server controls that bind to AX data through standard ASP.NET data binding mechanism. Specifically the data bound controls bind to an AX data source control which is a standard ASP.NET data source control extended to bind to AX data. The AX data source control in turn uses the new AX AOT object called a Data Set to actually retrieve and manipulate AX data. The User Control is then surfaced in Sharepoint in a similar fashion as in 4.0 by using the new Dynamics User Control Web Part.
In order to illustrate the basic concepts I will step through how to create a page that contains a grid with AX customers.
Creating the Data set
The data set is a new AOT node in AX 2009. It is the primary way that EP 2009 accesses and manipulates data in AX. The data set brings the familiar data and programming model known from AX forms together with ASP.NET data binding. Using the data set it is possible to expose and shape EP data from several AX tables using the contained form data sources and the various join types. In addition the data set offers an extensive X++ programming model for validating and manipulating the data when creating, reading, updating or deleting in EP. The AX data source control is the main driver of the data set in EP. It will run the data set which will prompt the data set to execute a query to fetch the customer records from the CustTable.
To keep it simple I will create a data set with one form data source which will point to the CustTable.
1. Go to the AOT and locate the Data Sets node.
2. Create a Data Set in the AOT and name it SampleCustomers.
4. Change the name property to CustTable and set the Table property to CustTable.
By adding a data source for the CustTable the data set will retrieve customer records from the CustTable. The data set is now ready to be used in a User Control.
Creating the User Control
In EP 2009 the UI specifically the User Controls are designed using Visual Studio. Visual Studio offers a rich design time modeling experience for User Controls and together with the Enterprise Portal Developer Tools the design experience is integrated with the AOT and Sharepoint.
So the first steps are to open Visual Studio and to create a Dynamics AX Web Project. In Visual Studio select \New\New Web Site from the File menu. In the subsequent New Web Site dialog a Dynamics AX Web Project should be located under My Templates. If it is not present make sure that the Language selected in the dialog is Visual C#. The dialog should look something like the following screen shot.
After clicking OK a project is created in Visual Studio that contains amongst other things a node called AxUserControl.ascx (the other nodes will be covered in later posts). The AxUserControl.ascx node is an ASP.NET User Control that is geared towards EP development. That simply means that the appropriate import statements and namespaces have been added to enable the use of the EP framework in the User Control. That is the only thing that separates it from a standard ASP.NET User Control.
To surface the customer list I will need two controls in the User Control. Switch to Design mode for the User Control by right clicking on the AxWebUserControl.ascx node and selecting View Designer. That should bring up a blank design surface where the content of of the User Control can be designed.
Open the Visual Studio Toolbox and locate the Dynamics AX tab. When you expand it you will notice a list of Dynamics AX specific ASP.NET server controls that can be used to create the content of a User Control.
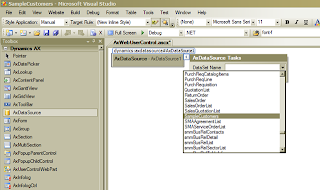
From the list the first control that is needed is the AX data source control (AxDataSource). Drag and drop it from the Toolbox onto the design surface. When dropping the data source control onto the design surface of the User Control a small tasks pane appears with a drop down list. The drop down list contains all the data sets defined in the AOT including the SampleCustomers data set I just created.
After selecting the SampleCutomers data set in the drop down list the AX data source control is now tied to that specific data set in the AOT.
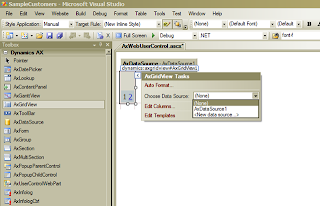
The second control that I need is the AX grid control (AxGridView). This control is a standard ASP.NET GridView control (and thus an ASP.NET data bound control) because it derives from the GridView class. It adds additional functionality like an improved user experience, integrated filter control, context menu and a lot more. The AX grid control will be used to render the list of customers. Again drag the AxGridView control from the toolbox onto the design surface and drop it underneath the data source control.
After dropping the AxGridView control onto the User Control I will link it to the AX data source control by selecting the data source control (AxDatasource1) from the drop down list on the AxGridView's tasks pane. The grid control is now bound to the data source control and using standard ASP.NET mechanisms the AxGridView control will at runtime ask the data source control for data which will prompt the data source control to run the data set defined in the AOT.
However before I get that far I need to define the fields from the CustTable that I want displayed in the grid. This step is similar to the step in EP 4.0 where fields from the form data source on the web form are dragged to the container controls under the Design node. To accomplish this I will use the AX bound field designer.
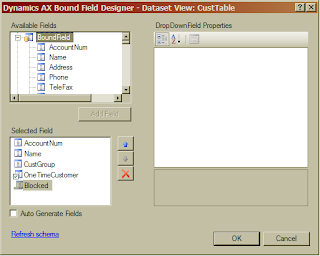
Open the bound field designer by clicking the Edit Columns link on the AxGridView's tasks pane. In the bound field designer all the fields from the CustTable as well as Field Groups are listed in the Available Fields tree view.
The fields are grouped into different bound field types like BoundField, BoundFieldGroup, CheckBoxField, DropDownField, etc. The most common type is the BoundField and most of the fields in the CustTable are listed under that node in the tree view. The BoundField will render the data as a read-only string when the data is read-only, and in a editable text box when the data is editable. It is used by EP for most table field types in AX i.e. String, Integer, Real, Date, Time, UtcDateTime and Int64. The CheckBoxField and DropDownField types are used for Enum table fields. The way the fields are grouped in the tree view is thus determined the field types on the table - in other words it is driven by the metadata defined in the AOT. If you contrast this with EP 4.0 where when dropping a form data source field on the Design node in a Web Form the field is automatically transformed into a suitable control based on the field type, you can see that EP 2009 continues the metadata driven approach to designing the UI.
Side Note: An AX bound field is an ASP.NET concept that is used in the new EP framework for data binding. The AX bound fields are used to describe the fields in a data bound control. They play an important role in EP (and in ASP.NET data binding) where they besides rendering the data for the individual fields also do field level security trimming, data validation, data formatting, and a lot more. They will be covered in more depth in later blog posts.
So from the Available Fields tree view I will select the set of fields that I want to bind to on the grid. Double click on the AccountNum, Name and CreditMax. Note that the CreditMax field is a Real field type in the AOT. I also want to bind to the Enum field OneTimeCustomer, which is located under the CheckBoxField node in the tree view.
After selecting the fields in the bound field designer click OK and the grid should now render the selected fields as columns on the design surface.
Side Note: Field groups are not rendered in the design view and will appear as an empty column in the grid. Only at runtime is the field group flattened into the actual fields.
Let's rename the AxWebUserControl.ascx User Control to SampleCustomers.ascx by right-clicking on it and selecting Rename. After saving the User Control it is now complete.
But before I can add it to a page in EP I need to import the User Control to the AOT. That is required in order for it to be deployed to the web server where EP is setup. Fortunately that is very simple. The Enterprise Portal Developer Tools in Visual Studio enable this by right-clicking on the User Control in the Solution Explorer and selecting Add to AOT.
That will save the User Control in the AOT under \Web\Web Files\Web Controls and in addition it will deploy the User Control to the web server where the EP development site is deployed. The Enterprise Portal Developer Tools offers more functionality like loading existing User Controls from the AOT into Visual Studio, which will be described in another blog post. For now the important part to note is that the User Control is saved in the AOT as well as deployed to the web server.
Side Note: From this point on whenever the User Control is saved in Visual Studio the User Control will, courtesy of the EP Developer Tools, also be updated in the AOT and it will be redeployed so the changes can immediately be seen in Sharepoint when the page is refreshed. This link is reestablished when the Visual Studio project is reopened after a shut down.
Bringing it all together in Sharepoint
The final part is to create a new page in Sharepoint where the User Control will be added. This step is similar to 4.0 except that I will not add a web form web part to the page but the new Dynamics User Control Web Part. Navigate to EP and create a web part page named SampleCustomers. Once the page is created bring up the web part gallery picker by putting the page in edit mode and clicking Add a Web Part on one of the web part zones. In the gallery locate the Dynamics User Control Web Part and select it.
Modify the properties of the new Dynamics User Control Web Part and in the Managed content item drop down list locate the SampleCustomers User Control. Click OK on the web parts properties pane and exit the edit mode off the page.
The page should now render the User Control in the web part as grid of customers.
Without writing code I created a list of customers using ASP.NET controls that bind to AX data and leverage the AOT defined metadata, by simply dragging and dropping in Visual Studio. Pretty cool.
Summary
This was a rather lengthy post and I just barely scratched the surface of EP 2009! The basic concepts were introduced in the form of a User Control containing the data bound AxGridView control and the AxDataSource control binding to an AX data set defined in the AOT. The key points being:
- The AX data set defined in the AOT is the central piece in the way EP exposes AX data.
- The data is exposed to ASP.NET data bound controls via the AxDataSource control.
- The UI is driven by the metadata defined in the AOT.
In addition I demonstrated the new way of developing using Visual Studio as the UI designer and how it integrates with the AOT through the EP developer tools.


